How To Screenshot On 60% Keyboard (Step By Step)
Taking screenshots is common for many computer users, whether for work, school, or personal use.
If you’re using a 60% keyboard, you may wonder how to take a screenshot with the reduced number of keys.
Fortunately, taking screenshots with a 60% keyboard is still possible, and it’s not as complicated as you might think.
How To Screenshot On 60% Keyboard (Guide)
1. Locate the Print Screen Key
The first step to taking a screenshot is to locate the Print Screen (PrtSc) key on your keyboard.
This key is typically located in the top row of keys on a 60% keyboard, but it may be combined with another key, such as the function key (Fn) or the control key (Ctrl).
Look for a key with “PrtSc” or “Print Screen” written on it or a symbol that resembles a camera.
2. Press the Print Screen Key
Once you’ve located the Print Screen key, press it to take a screenshot of your entire screen.
The screenshot will be saved to your clipboard if you’re using a Windows computer. If you’re using a Mac, the screenshot will be saved to your desktop.
3. Take a Screenshot of a Specific Area
If you only want to capture a specific area of your screen, you can use a combination of keys to take a screenshot on a 60% keyboard. Here’s how to do it.
Windows: Press the Windows key + Shift + S. This will open the snipping tool, allowing you to select the screen area you want to capture.
Press the Shift + Command + 4 keys. This will change your cursor to a crosshair, which you can use to select the area of the screen you want to capture.
4. Save and Edit Your Screenshot
After taking your screenshot, save it to your preferred location and edit it as needed.
On a Windows computer, you can open an image editing program like Paint, paste the screenshot from your clipboard, and save it to your computer.
On a Mac, you can open the screenshot from your desktop and edit it using the Preview app.
Frequently Asked Questions (FAQ)
Q2. How do you take a screenshot on a keyboard?
Ans: To take a screenshot on a keyboard, you can use the Print Screen (PrtSc) key, usually in the top row of keys on most standard keyboards.
Pressing the PrtSc key captures an image of your entire screen. If you only want to capture a specific area of your screen, you can use third-party software.
You can also use the built-in Snipping Tool or Snip & Sketch feature that comes with Windows.
Q2. How do you take a screenshot on an RK61?
Ans: To take a screenshot on an RK61 keyboard, press the “Fn + Insert” keys.
The screenshot will be saved to your device’s clipboard. Open an image editing program and paste the screenshot to edit it, and save it to your desired location.
Note that the key combination for screenshots may vary depending on the keyboard model or device.
Q3. How do I take a screenshot on Windows 10 with a 75% keyboard?
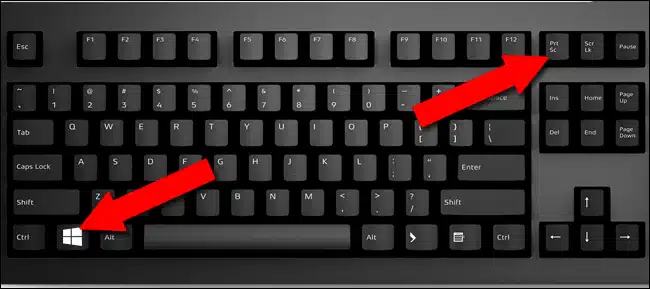
Ans: To take a screenshot on Windows 10 with a 75% keyboard, use the “Windows key + Print Screen” keyboard combination.
First, locate the “Windows” and “Print Screen” keys on your 75% keyboard. The “Windows” key is typically located between the “Ctrl” and “Alt” keys, while the “Print Screen” key is usually located in the top row of keys.
Press and hold down the “Windows” key, and while still holding down the “Windows” key, press the “Print Screen” key. This will capture and save the screenshot to your device’s “Pictures” folder.
Conclusion
In summary, capturing screenshots on a 60% keyboard is a straightforward task that requires only a few key combinations.
By identifying the location of the Print Screen key and learning how to take a screenshot of a particular area, you can capture images of your computer screen.
Whether using a Windows PC or a Mac, this process is quick and simple, taking only a few seconds to complete.
By following the guidelines provided in this article, you can easily take screenshots on your 60% keyboard. This will improve your productivity and communication skills.