3 Ways To Connecting A Wireless Keyboard (Updated)
Are you having trouble connecting a wireless keyboard to your system?
Then you are at the right place.
The first thing you must know is the type of keyboard you have.
- Does your keyboard come with a wireless receiver? If yes, you can directly plug the receiver into the USB port.
- Does your wireless keyboard use Bluetooth? If yes, turn on your keyboard’s Bluetooth pairing and add your device.
Let us have in-depth knowledge of how to connect wireless keyboards.
What is a Wireless Keyboard?
A wireless keyboard is a keyboard that uses wireless technology to connect to compatible devices, such as computers, laptops, tablets, or smart TVs. Unlike wired keyboards, they do not require a physical connection, providing a clutter-free workspace and enhanced mobility.
Benefits of Using a Wireless Keyboard
- Convenience and Mobility: Wireless keyboards offer the freedom to work or play without restrictions, allowing users to type comfortably from various positions and angles.
- Clutter Reduction: They eliminate the need for cables, creating a neater and more organized workspace.
- Ease of Installation: Setting up a wireless keyboard is straightforward, with most requiring only a USB receiver to be plugged into the computer.
- Ergonomic Designs: Many wireless keyboards feature ergonomic designs that reduce strain on the wrists, hands, and fingers, promoting a healthier typing experience.
How to Connect Wireless Keyboards Without Receivers?
Remember, not all wireless keyboards support connectivity without their receiver.
While some keyboards support Bluetooth connectivity, others come with wired connectivity options.
Connecting A Wireless Keyboard With Bluetooth to Windows
Look at your keyboard’s manufacturer/model number to know if it supports Bluetooth connectivity.
If it does support Bluetooth connectivity, look for a switch on your keyboard. The switch will work as a toggle between the two devices.
Follow the steps to connect the wireless keyboard via Bluetooth:
- Step 1: The first step- switch on the wireless keyboard. The power switch should be located on the backside of your keyboard.
- Step 2: After switching on the keyboard, allow the device to pair. Once the keyboard comes to pairing mode, the light on the keyboard will start blinking.
- Step 3: Next, turn on the PC and select the Windows icon.
- Step 4: Go to All apps and click “Open Settings.”
- Step 5: Select “Bluetooth and Devices” and turn on Bluetooth.
- Step 6: Once the pairing mode is on, it will appear on the “Add a device” page. Click on your device’s name.
- Step 7: Next, enter the PIN on the wireless keyboard. If the pin is correct, the keyboard and PC will pair up. If not, enter “0000” or check for the correct PIN in the instruction manual.
- Step 8: Press a key to check if the keyboard functions smoothly.
Note: You might face lag when using Bluetooth to connect the keyboard.
Tip: If your PC does not have Bluetooth, you can use a Bluetooth dongle. Plug the Bluetooth dongle into a USB port and allow it to install its drivers. Restart both devices and repeat the process if the connection is not established.
Want to disconnect the keyboard from your PC? – Turn the keyboard off or click on the Bluetooth menu and choose “Remove this device.”
Connecting A Wireless Keyboard With Bluetooth to Mac
Before connecting your wireless keyboard, make sure of two things.
- First, the wireless keyboard is charged.
- Second, the wireless keyboard is in pairing mode.
Different keyboards go differently into pairing mode.
However, most wireless boards have a specific button or switch. Press the button/switch to start the pairing mode. Check the keyboard’s manual for instructions if you feel stuck starting the pairing mode.
Follow the steps to connect the wireless Keyboard to Mac:
- Step 1: Go to your Mac’s “System Preferences” app. To locate the app, select the Apple icon in the top-left corner of your screen.
- Step 2: Click on the “Bluetooth” icon from the listed options. You can also locate the Bluetooth icon on your device’s search bar.
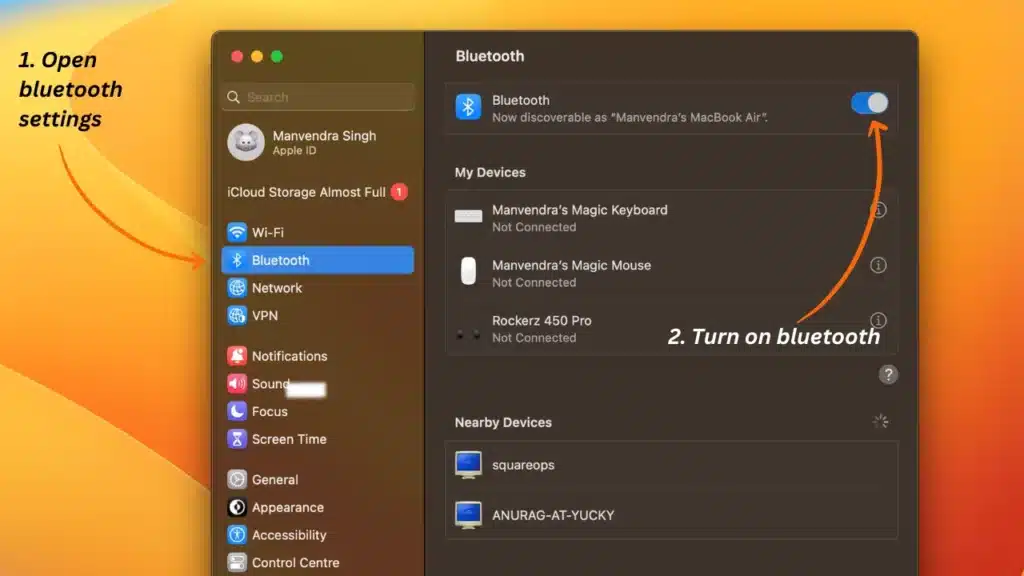
- Step 3: Put your keyboard on the pairing mode and look for it under “Devices.”
- Step 4: Click the “Connect” icon beside your device’s name.
- Step 5: After establishing the connection, your Mac will ask you to press a series of keys. This will help Mac to identify if the right device is connected. Follow the commands, i.e., press the keys indicated.
- Step 6: Once done, your device will take a moment to connect. You’ll see “Connected” under your keyboard’s name. This indicates the pairing is successful and the wireless keyboard is ready.
Tip: If the device cannot connect, restart your keyboard and macbook.
Want to disconnect the wireless keyboard from your Mac? – Right-click on the Bluetooth menu. Proceed to select the “Disconnect” option to remove the device. Alternatively, turn the keyboard off.
Tip: If the device asks you to enter a passcode, type “0000.” Check the keyboard’s manual for a specific passcode if the passcode is wrong.
Using a Unifying Receiver To Connect Keyboard
Another way to connect a wireless keyboard is to use a unifying receiver.
However, not all devices (except Logitech and Dell) support unifying. One of the best features of this receiver is that you can pair up to six devices at once.
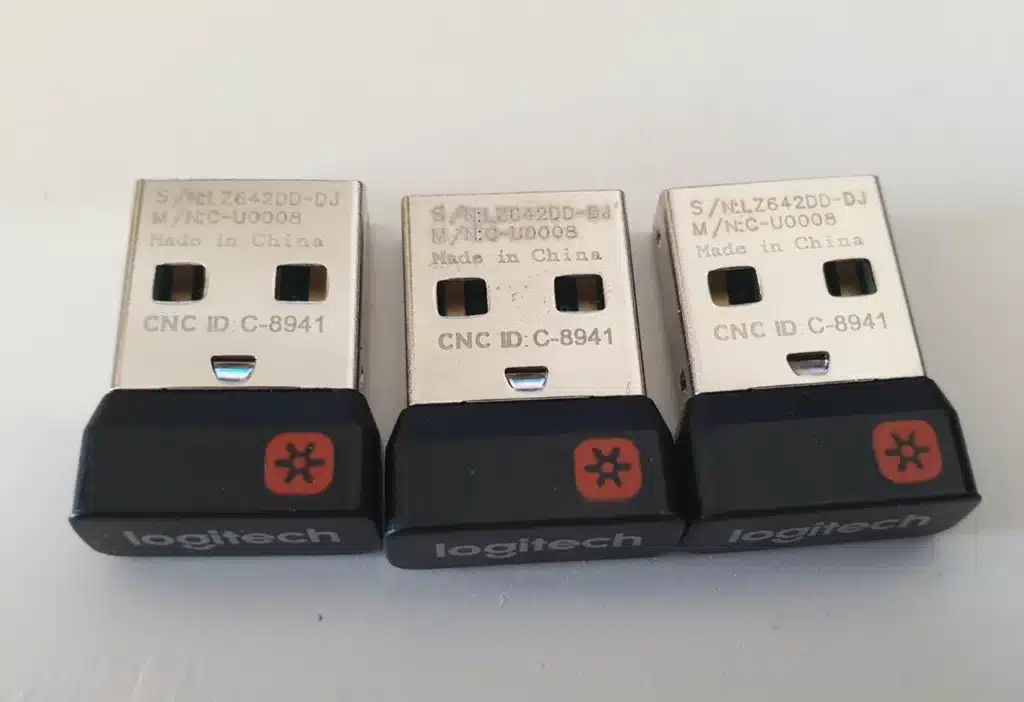
Don’t know if your Logitech keyboard supports a unifying receiver? Check the keyboard’s outer part for an * sign for the Logitech keyboard.
For a dell keyboard, look for a chain icon. Can not find the chain or an * icon? Search the keyboard name and model number on the internet.
If your keyboard supports the connectivity, you only need a Unifying receiver. Let’s start setting up the unifying receiver.
Logitech Unifying Reciever
To use the Logitech Unifying receiver in your keyboard, follow the steps below:
- Step 1: The first step is to connect the Unifying receiver on the computer.
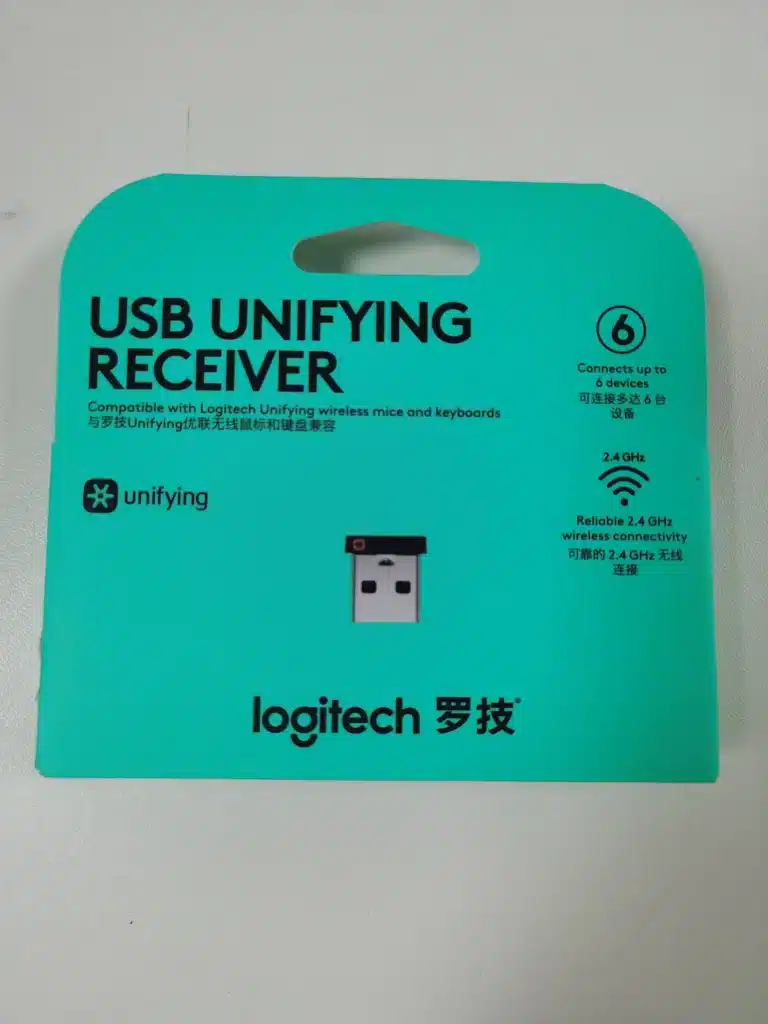
- Step 2: Go to Logitech’s official support page to connect the receiver. Next, download Logitech Unifying Software.
- Step 3: Install and run the application after the software is safely downloaded.
- Step 4: After running the application, Click on Next.

- Step 5: Using the Slider on the keyboard, turn off the keyboard.
- Step 6: After a few minutes, turn the keyboard On.
- Step 7: The application will establish a connection by automatically detecting the wireless keyboard.
Dell Unifying Reciever
To connect the Dell Universal Receiver, follow the following steps:
- Step 1: Start with inserting the Universal receiver on the PC.
- Step 2: Visit Dell’s official support page and download the Dell Universal Receiver Control Panel.
- Step 3: Once the receiver s installed, run the receiver control panel.
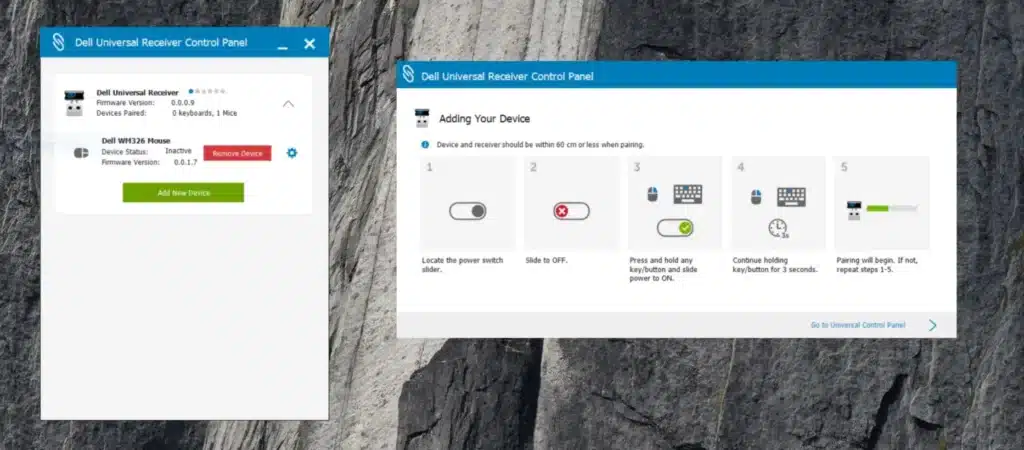
- Step 4: Click “Add New Device” to add the peripheral.
- Step 5: Using the Slider on the keyboard, turn it off.
- Step 6: With the help of the virtual toggle, turn on the keyboard.
- Step 7: Hold the key for 3 seconds to initiate pairing.
- Step 8: Once the pairing is successful, click on Yes.
Common Issues and Solutions
Why My Wireless Keyboard is Not Connecting
If your wireless keyboard is not connecting, there are several common issues to check:
- Low Battery: Ensure the batteries are not low or dead. Replace or recharge them if necessary.
- Dysfunctional Ports: Try plugging the receiver into a different USB port to rule out port issues.
- Interference: Other wireless devices can cause interference. Move the receiver and keyboard away from other wireless devices and metallic surfaces
Troubleshooting Low Battery, Dysfunctional Ports, and Interference
- Check Battery Levels: For keyboards with replaceable batteries, check if they are low and replace them. For rechargeable keyboards, plug them in to charge.
- Test Different Ports: If using a USB receiver, try plugging it into a different USB port to ensure the issue isn’t with the port itself.
- Reduce Interference: Move the receiver and keyboard away from other wireless devices, cordless phones, and metallic surfaces to reduce interference.
Updating Drivers for Undetectable Keyboards
- Update Drivers: Ensure that your keyboard drivers are up to date. Outdated drivers can cause connectivity issues.
- Reinstall Drivers: If updating doesn’t work, try uninstalling and reinstalling the keyboard drivers through Device Manager.
- Use Troubleshooters: Windows offers built-in troubleshooters for Bluetooth and keyboard issues. Run these troubleshooters to identify and fix problems
Frequently Ask Questions (FAQs)
Q1. How do I connect a new wireless keyboard?
Ans. To connect a new wireless keyboard:
- Click on the Start button > Settings > Devices > Bluetooth & other devices.
- Switch your wireless keyboard to pairing mode. Once the keyboard is in pairing mode, click “Add Bluetooth or other devices” and select your device. Once you choose your device, it will pair up with the system.
Q2. Where is the pairing button on the wireless keyboard?
Ans. A wireless keyboard will have a Bluetooth button at the top right corner. Hold the Bluetooth key for 4- 5 seconds to enter pairing mode. When the device is ready to pair, it will display a blinking LED light.
Q3. Why is my wireless keyboard not connecting?
Ans. Here are a few common reasons why the wireless keyboard is not connecting:
- The batteries of your wireless keyboard are low in power.
- The receiver is plugged into a dysfunctional port.
- The wireless device is unable to form a sync with the receiver.
- There may be confluence from other wireless devices.
Q4. How do I activate my new keyboard?
Ans. To activate a new keyboard:
Click on Start > Settings > Time & language. Select the language of your choice that you want the keyword to run on. Proceed to “Add a keyboard” and choose the keyboard you want to activate.
Q5. Why is the keyboard not detected?
Ans. A common reason your OS cannot detect your keyboard is due to outdated or corrupt drivers. This issue can be easily fixed by using a keyboard tester.
Else, you can follow the following steps to fix these issues:
- Right-click on the Start icon and click on Device Manager > Expand Keyboards.
- Right-click on the undetectable keyboard and click on Update driver.
- This will update the drivers and make your keyboard functional.
Conclusion
Connecting a wireless keyboard with a receiver is easy.
However, you can also connect the keyboard to a receiver. We have listed all the possible ways to connect your keyboard effortlessly.
If you face any problem, retrace the steps mentioned above carefully.

